Uploading and Tagging Contacts on the Cunnekt Platform
If you seek to market your Business on WhatsApp using Cunnekt platform, then you must arrange the contact details of your target audience. Businesses must arrange the basic contact records of their large customer base to aid Cunnekt in communicating with them over WhatsApp. Every message campaigning on Cunnekt requires you to arrange mandatory details such as country codes and phone numbers of your clientele for broadcasting promotional messages on WhatsApp. In this article, we will inform you on how to add contacts to your Cunnekt account for bulk as well as quick message broadcasting. Here, we will also learn about the contact tagging procedure along with its importance. So, let us quickly jump to the process.
How to upload and tag WhatsApp contacts for campaigning purposes?
The procedure is detailed but simple. All you have to do is strictly adhere to the sequence we have discussed with you in the following sections. So let us start with the basic query of yours:
How to Begin?
Firstly, as a platform user, log in to your Cunnekt account, and click on the label of the contact on the Dashboard Window. An ‘All Contacts’ window will appear. Click on the ‘Add Contact’ button. A drop-down option list of ‘Create a New Contact’ & ‘Bulk Upload’ will appear. Let us see them one by one.

1. Creating & Uploading a Single Contact:
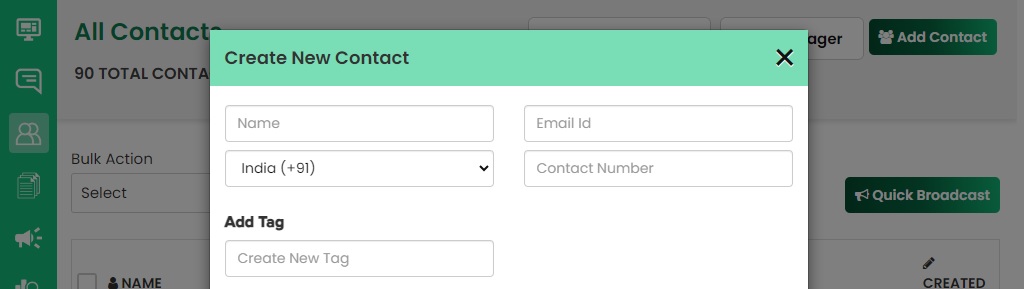
Step 1: Enter Contact Details
The Create a New Contact option will upload a single contact. Upon clicking the option, the ‘Create New Contact’ window will pop up. Here you can add the relevant details or attributes of the single contact you wish to add, such as:
- Name
- Email ID
- Country Code
- Contact Number
Here, country code and contact number are mandatory fields. Every contact record must contain these two fields in the proper format.
Step 2: Add Attributes to the Contact
Also, you can add further attributes to your contact details by entering the attribute’s name and its corresponding value in the ADD ATTRIBUTE section. Suppose you wish to add the put-in state of the contact by adding state as the attribute name and Goa as the attribute value.
Step 3: Tag the Contact with an existing one or create a new Tag
Assigning a Tag to a contact can be thought of as associating it with a name or a class. Each Tag represents the number of contacts it is attached to. You can filter contacts from the Bulk by selecting the tag attached to them. To tag a contact, you can choose from the existing tags or create a new tag by entering its name in the Add Tag text box.
Note: Cunnekt encourages the use of Tags to segregate the audience intended for campaigning purposes.
Step 4: Contact saved successfully
Finally, click on the Save Button. Your contact will be saved successfully.
2. Uploading Contacts in Bulk
Now, let us understand a bit about the bulk upload. Bulk Upload refers to uploading contact details of all WhatsApp Users for message broadcasting in one go. If you wish to broadcast a message to a list of users, then you can upload the contact details of these users in one go using the Bulk Upload option. Let us understand the procedure for bulk upload.
Step 1: Adding Contacts through a CSV file
Click on the ‘Add Contacts’ button & choose the Bulk Upload Option. A Bulk Upload window will appear. You can bulk-upload contacts by uploading a CSV file containing the relevant contact records in the proper format.
Note: Every to-be-uploaded CSV file must contain a line containing the attribute names of the contact records. This is done for Cunnekt to map the contact fields with the contact attributes saved on the system. To know more about the format, download and check the sample CSV file by clicking on the ‘Download Sample CSV’ button.
Step 2: Observe the What’s and Whatnots before Uploading a CSV file
Here, you need to keep the following things in mind before uploading a CSV file:
- You can maximum upload 50000 contacts in a single CSV file and the file size must not exceed 50 MBs.
- Each contact record in the file must mandatorily have two fields:
- Phone Number
- Country Code
- If two or more contacts have the same phone number, Cunnekt will upload the last one from the list.
- If a contact exists in your Cunnekt account, Cunnekt will upload the existing contact’s data as per the data available in the file. Cunnekt matches contacts in the system based on the Phone Number.
If you are upright with the instructions, then, click on the ‘Choose File’ button and upload the CSV file.
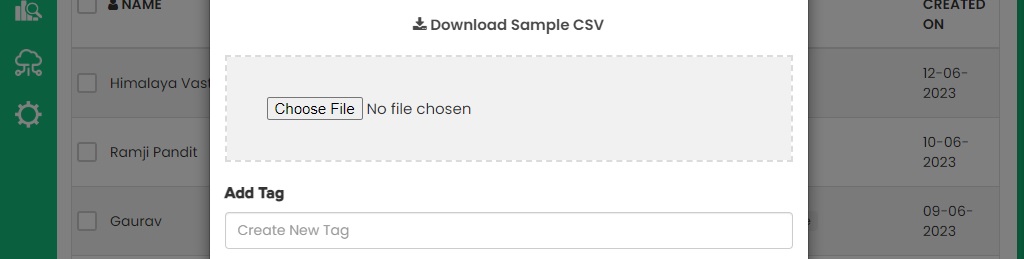
Step 3: Tagging and Uploading the Bulk Contacts from the CSV file
You can also add tags to the bulk upload contacts by selecting from the existing tags or creating a new tag by adding the tag’s name in the text box. After the tagging procedure, you can click on the SAVE button. Your contacts will be uploaded successfully.
Step 4: Mapping the Uploaded Contact Records to saved Attributes
Thereafter, you will be directed to the ‘Bulk Upload in Progress’ window. The uploaded CSV file’s first row details the columns denoting contact attributes. The popped up window asks you to map the file’s column names with the contact’s attributes for a successful bulk upload. Suppose, you have columns, such as Country Code, Phone Number, Name, Email, City, DoB, & Gender in the CSV file, then Cunnekt will ask you to make these columns with the saved attributes on its system.
Here, you will see these column tiles, namely:

Each tile is labeled with a column name from the CSV file, and you must choose from the existing options from the drop down list, containing the saved attributes on the system, for proper mapping. Upon mapping each column field with an attribute, hit the Confirm button. Thereafter, you will be again directed to the All Contacts window with the success message ‘Contacts Imported’.
Thereafter, you can use the attached tag(s) to the contacts uploaded in bulk for creating campaigns on Cunnekt’s platform. For more such procedural blogs, refer to the Cunnekt’s Resource Centre.