How to add Agents to your Cunnekt Account?
Let us understand Agents
For Businesses holding a Cunnekt Account, Customer Support Agents or simply Agents are your personnel who will have access to a Cunnekt Account. Businesses create Agents to cater to their every need on WhatsApp. You can create n numbers of Agents. But each Agent’s responsibilities may vary depending upon permissions you grant them in overseeing sections of our Business Operations. An Agent has access to features or modules of the Cunnekt platform. He or she can be involved in the customer support, product marketing, analytics overviewing and other services of your Business.
Why Unlimited Agents at Cunnekt?
In today’s time, Businesses ‘emphasis is on quality service delivery. Cunnekt understands that Businesses can serve their customers better with more Agents in support services. Therefore, we at Cunnekt aid Businesses in catering to their large customer base by facilitating them with adding unlimited Agents on our CRM, i.e., the Customers Relations Management portal. The Agent pool, as required, can quash any number of queries by interacting with customers on WhatsApp using Cunnekt’s CRM.
Learn How to Add Agents to Your Cunnekt Account
Since you are now aware of the Multi-Agent facility at Cunnekt’s CRM, now we will guide you on how to add Agents to your Cunnekt account as a Business admin. The following steps are simply straightforward.
Step-by-Step Procedure
Step 1: Log in to your Cunnekt Account and click on the system setting button from the icon tray vertical at the left edge of the Cunnekt dashboard window.
Step 2: On clicking the System Settings button, a box will appear with further page navigation options. Click on the Manage Agent Option.
Step 3: An Agent window will appear.

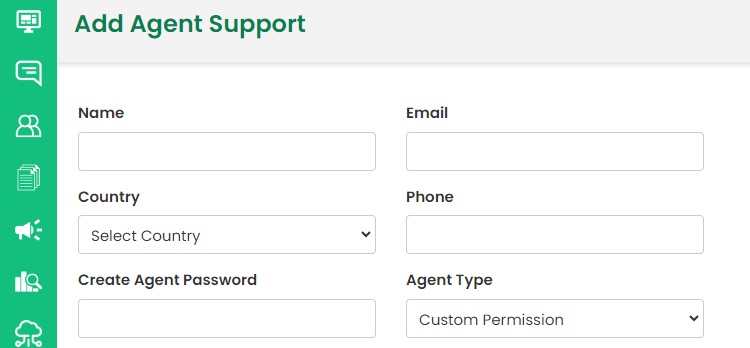
Click on the Add Agents button in the top right corner of the window. An Add Agent Support window will open up. On this page, you must enter all the relevant details to register the Agent with the Cunnekt’s platform, such as:
- Name: Enter a valid name of the Agent
- Email: Enter a valid email of the Agent. This email will be used as a user ID credential by the to-be-registered Agent while logging into the Cunnekt portal.
- Country: Enter the native place of the Agent
- Phone: Enter a valid contact number of the Agent
- Create Agent Password: Enter a strong cryptic password for the Agent’s Cunnekt login
- Agent Type: Choose an Agent type from the following:
- Admin: If you wish to delegate the Agent with all major responsibilities as that of an Admin, then choose the Admin option. The Admin option will yield access to everything that the Business Owner has. He can share his or her full-fledged Cunnekt Account with the Agent.
- Custom Permission: In such an option, the admin chooses to delegate certain aspects of the functionary services provided on the Cunnekt platform. Such an Agent will have access to limited features on the Cunnekt app, as decided by the Admin.
Step 4: As soon as you select the Custom permission option, the entire Cunnekt Functionary List will drop down on the Agent Support window, such as:
- Chat Supports
- Contacts
- Templates
- Campaigns
- Analytics
Each option is further categorized into multiple access permissions, for the Chat Supports option, you have:
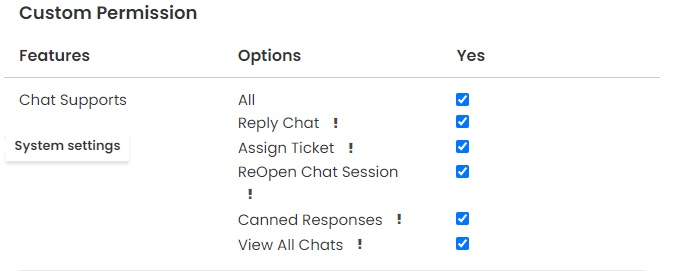
Each of such options and sub-options can be checked or unchecked by you while deciding the bulk of delegation it intends for the to-be-registered Agent. After deciding on the Agent’s responsibilities, you must then decide on their chat assignment procedure.
Step 5: If your Cunnekt Account is set on the Round Robin settings of chat assignment, and you want an automatic assignment of customer chats to the Agent in the round robin manner, then you can turn the Assign Chat Automatically toggle button ON. Otherwise, if you wish to assign chats to the Agent manually, then keep the toggle button OFF. If you want to learn how to change the CRM settings for Customer Chat Assignment to Agents on your account, then click on the link here.
Step 6: Upon completing all the necessary details, hit the save button to complete the New Agent Addition procedure. The Agent window will show the message, ‘User added successfully.’
Thereafter, you can share the Email ID and the created password as the Cunnekt portal’s login credentials to the Agent. They can log in to the portal, and begin their services on the Cunnekt app.
Learn more about such operational procedures for Cunnekt platforms from our Resource Centre.